Cisco has recently entered the Physical Security market with video surveillance and access control solutions that integrate web-based software with video broadcast hardware for various physical security implementations. [Read more…]
Home Security Monitoring with Skype and Security WebCam
Skype is a revolutionary software for making free (or cheap) VoIP calls through the Internet to almost anywhere in the world. The integration of Video functionality in Skype enables us to use the application as Video Security / Surveilance solution for our home. There are other options for cheap remote security monitoring, as described in my post use-your-home-network-for-home-security-monitoring but I just wanted to provide you with an alternative option with Skype, which adds also voice monitoring in addition to video.
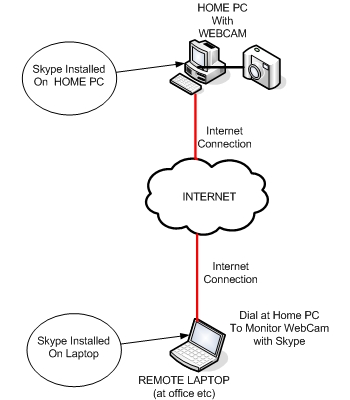
For the above setup you will need two Skype accounts (one for the Home PC and one for the remote location which might be your office at work or anywhere with internet access) and a USB webcam which will be connected to your Home PC. See the diagram below to get an idea for the network setup:

To configure Skype (version 3.8.x) for video security monitoring, follow the steps below:
1. On your Home PC Skype application go to Tools>Options>General>Video Settings and click on “Enable Skype Video” and also “Start my video automatically when I am in a call“.
2. Again on your Home PC Skype application go to Tools>Options>Calls>Call Settings>Show Advanced Options and click on “Automatically Answer Incoming Calls“.
Then from your “remote Skype” computer just call your “Home Skype” computer which will automatically answer the call and enable the WebCam which will start sending you live video to your Remote Skype for security monitoring.
Use your Home Network for Home Security Monitoring
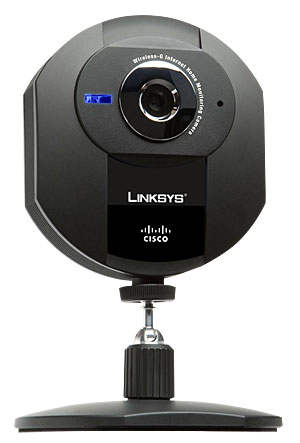
As we have discussed in the post “The need for setting up a home network”, one of the benefits of having a wired or wireless network set up in your home is that you can remotely monitor the inside of your home using a security wireless camera. The security camera can be connected either wired (using Ethernet cable) or wireless (using 802.11 wifi technology) on your home network router, which in turn can provide access to your internal monitoring camera from the Internet. The Internet Home Monitoring camera from Linksys shown below can be used to send live video and audio to your web browser anywhere in the world.

The wireless security camera from Linksys has a build-in web server and video stream encoder. So, by pointing your web browser to the IP address of the camera, you can receive live video and audio streaming. You can also turn on Security Mode, which tells the camera to send a message with a short video attached to up to three email addresses whenever it detects motion in its field of view. You can then log onto the live video stream if the situation warrants. The included Viewer & Recorder utility lets you record the audio/video stream to your local hard drive, “live” or on a predetermined schedule.
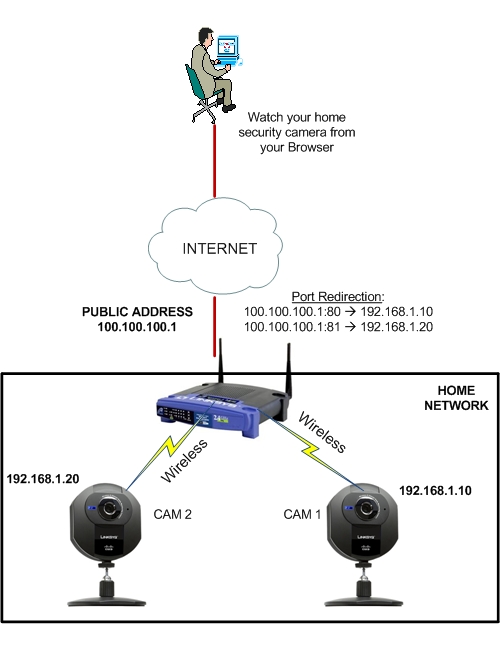
The diagram below illustrates how to implement two security cameras in your home network:

- First configure the cameras to work with your wireless home router
- Then assign IP addresses to the network settings of the cameras, as shown.
- CAM 1: IP address 192.168.1.10
- CAM 2: IP address 192.168.1.20
- Assume that your public IP address that you were assigned from the Internet Provider is 100.100.100.1. Configure port redirection on your Internet Router so that inbound traffic on your public address on port 80 is redirected to internal IP address 192.168.1.10 (CAM 1). Similarly, configure redirection for port 81 to connect to IP 192.168.1.20 (CAM 2).
- Now, in order to connect remotely to your internal cameras, just point your browser to http://100.100.100.1:80 (to watch CAM 1), and to http://100.100.100.1:81 (to watch CAM 2).
The above provides basic security monitoring for your Home. If your are interested for a complete home security solution and protection, get a FREE quotation for a Professional Home Security System for peace of mind.